Start with the right input mode
Use T2V when the idea starts as words. Use I2V when an image should anchor the subject, composition, product, or style.
A practical user guide for turning a prompt or image reference into a directed Ray 3.2 result: describe the final video, lock important beats with keyframes, tune adherence, and export the version your edit needs. When you are ready to run a clip, open the Ray 3.2 AI Video Generator.
Before you start
Use T2V for building from language and I2V when an image should anchor the subject, composition, product, or style.
Use T2V when the idea starts as words. Use I2V when an image should anchor the subject, composition, product, or style.
Separate the fixed parts from the creative change: keep the motion, preserve the actor, replace the environment, relight the scene, or restyle the whole shot.
Choose whether this run is a draft, a client review, or a final delivery. That choice affects resolution, output format, and how much control you need.
How It Works
Most clips finish in under five minutes. You bring a prompt, optionally add an image reference, and the Ray 3.2 AI Video Generator handles the rest.

Start from text or an image reference, then describe the end result in plain language. Frame the prompt as a target state, not a command.

Pin up to 16 keyframes for exact pacing, tune Motion and Structure adherence, and use character locks when a face, body, or pose needs to stay intact.
Choose 540p for fast iteration or 1080p HDR with 16-bit EXR for the final cut. Match duration and quality to the review or delivery stage.
At the end you get a finished clip in your chosen resolution and format, with the original duration and motion intact and ready to drop into the next step of post.
Detailed walkthrough
The short version is upload, prompt, keyframe, tune, export. The production version is more deliberate: read the source, protect what works, change one layer at a time, and review the full clip before calling it finished.
Before you touch the prompt field, decide whether the shot should start from text alone or from an image reference. For T2V, define the subject, scene, camera, motion, and style directly in the prompt. For I2V, identify what the image should preserve: identity, product shape, composition, color palette, or visual mood.
Many weak generations start with command language: change this, remove that, fix the background, make it cooler. Ray 3.2 usually performs better when you describe the shot as it should look when the work is done. A target-state prompt reads like a short art direction note for a finished frame: a bright coastal product commercial, a warm interior study scene, a snow-covered mountain valley, a chrome character under blue rim light. This gives the model a stable destination instead of a list of edits that may conflict with one another.
Keyframes are not decoration. Use them when a beat needs to land: the opening composition, a midpoint pose, a product reveal, a facial expression, a hand placement, or the final hero frame. A simple restyle may need only a prompt and adherence settings. A client-facing product shot may need several keyframes so the bottle, label, hand, and final composition stay reliable. The rule is practical: if a reviewer would pause the clip at that moment and give feedback, it probably deserves a keyframe.
Motion adherence protects timing and movement. Structure adherence protects spatial layout, blocking, and composition. When an image reference or camera plan matters, keep these controls higher so the generated result stays recognizable. When the creative direction is more exploratory, lower them slightly and let Ray 3.2 reinterpret the scene. Avoid changing everything at once. If identity, product position, and camera rhythm all matter, protect those first, then iterate on style, lighting, and environment in later runs.
A Ray 3.2 result can look strong in a still frame but fail in motion. Watch the full duration before deciding it is usable. Check whether the first frame connects to the previous shot, whether the midpoint action still reads, whether the final frame lands, and whether any transformed object drifts or changes identity. For production work, export a draft first, make notes at exact timestamps, then rerun with narrower instructions. Move to HDR or EXR only after the motion and continuity are approved.
Video lessons
These examples use different video problems: motion, product placement, performance, and lighting. The goal is to learn what the prompt or image reference needs to make clear.
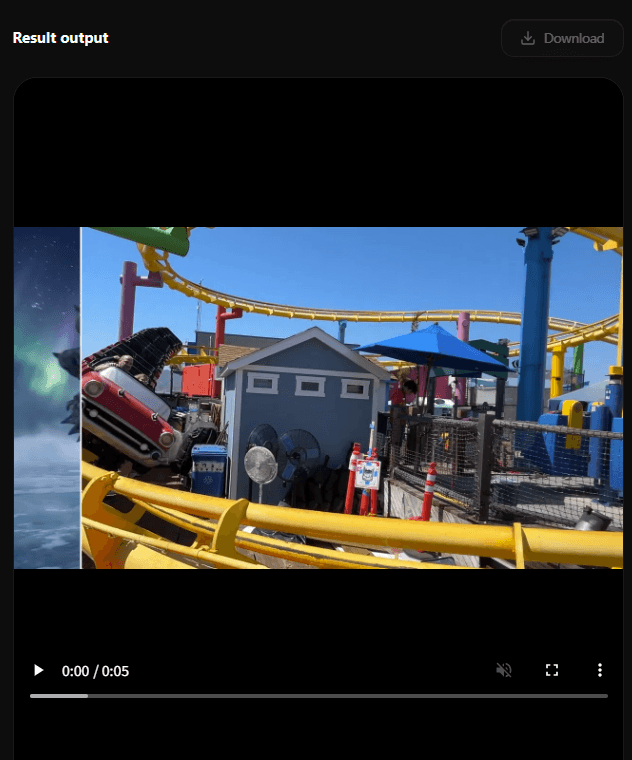
This fast amusement-ride shot is useful for learning Motion adherence. The camera and track movement are the point of the clip, so a Ray 3.2 prompt should protect the ride path, speed, and perspective before asking for a new visual world.
The beverage pour shows why Structure adherence matters. The bottle, glass, hand, ice, and horizon all create a composition that must stay readable. Use this kind of clip to practice product swaps, label changes, and lighting variations without losing the original staging.
This split comparison shows a performance being carried into a more stylized character result. It is a good reminder to describe both the new character surface and the original performance details that should survive: head turn, hand gesture, expression timing, and framing.
The warm interior writing scene is a clean relighting example. It has a clear subject, desk, window, and gesture. For Ray 3.2, this is the kind of source where you can change time of day or color temperature while preserving the calm action and composition.
Prompting
Too vague
Make this look better.
Better
A night market product shot with cool neon reflections, realistic wet pavement, the same camera push-in, and the same product position.
Too vague
Change the actor into a robot.
Better
The same performance and body motion, transformed into a polished chrome android with expressive eyes, soft studio rim light, and preserved facial timing.
Too vague
Put it in a different place.
Better
A desert sunrise environment with long warm shadows, the same subject scale, the same camera orbit, and natural atmospheric dust.
Controls
The same prompt or image reference can produce a subtle variation or a full stylized result. The difference is how tightly you hold motion, structure, and identity.
Use high Motion adherence when timing, gestures, or camera rhythm must match the prompt or reference image.
Use high Structure adherence when composition, blocking, or product placement must stay locked.
Use character locks when identity, pose, body proportion, or facial continuity matters.
Use Reframe after the creative direction is approved, not before you know the shot works.
Avoid these
If a result feels random, the issue is often the input choice, prompt shape, or control settings. Fix the workflow before blaming the model.
Starting with the wrong input mode for the job.
Writing a prompt that describes the editing command instead of the final image.
Using too many changes in one run before checking the first direction.
Lowering adherence when the shot still needs continuity.
Exporting a final before reviewing the motion at full duration.
Final review
A good Ray 3.2 result should not only look impressive as a still. It should behave like a usable shot across the full duration.
The output duration matches the edit or channel you planned to use.
The first, middle, and final frames all support the same creative direction.
Faces, hands, products, and readable labels do not drift across the shot.
The camera motion feels intentional rather than newly invented by accident.
The output format matches the next step: draft for review, HDR for high dynamic range delivery, EXR for finishing and grading.
FAQ
Short answers for the questions people usually have before their first Ray 3.2 run.
Start by choosing T2V or I2V. Then write a target-state prompt, add keyframes for important moments, tune Motion and Structure adherence, and review a draft before exporting anything final.
Ray 3.2 supports both text-to-video and image-to-video workflows. Use text when you want to build the scene from language, and use an image when the subject, composition, or style should anchor the result.
Use keyframes when a shot has specific beats that must land correctly, such as a product reveal, character turn, camera move, expression change, or final pose.
A good prompt describes the final state clearly: the subject, environment, style, lighting, motion, and what should remain consistent from the prompt or image reference. It reads more like art direction than a list of fixes.
Usually no. Start with the most important transformation first, such as relighting or environment change, then iterate. Trying to change product, character, camera, lighting, and style all at once makes the result harder to judge.
Motion adherence protects timing, gestures, and camera rhythm. Structure adherence protects layout, blocking, subject position, and composition. Raise the one that protects the thing your edit cannot afford to lose.
Watch the full clip, not just the best frame. Check the beginning, midpoint, and final frame; look for object drift, identity changes, broken hands, or motion that no longer matches the prompt or reference.
A draft is good enough when you are still choosing direction. Move to higher-quality output only after the motion, composition, and creative intent are approved. That saves credits and keeps review focused.
Independent SaaS workflow built on Ray 3.2. Not affiliated with Labs.